Here’s how to build a Marshall Bluesbreaker on stripboard. Sure, this thing isn’t anywhere as popular as something like an Ibanez Tube Screamer or a Boss OD-1, but it’s a guitar pedal that’s been increasing in popularity in recent years.
The Marshall Bluesbreaker is designed to sound like the old Marhsall amps Eric Clapton used when playing with John Mayall and the Bluesbreakers, and, although it really doesn’t, it still sounds like a great overdrive pedal.
There’s a lot less gain and breakup to the sound of this overdrive pedal (again, when compared to the gold standards of the Tube Screamer and OD-1), but that’s not always needed. It gives enough overdrive to add warmth and interest to the guitar’s tone. It may not sound exactly like an old Marshall amp, but it still sounds a lot like a tube amp struggling to keep up. This makes the Marshall Bluesbreaker pedal a great one for adding some interesting overdriven tones to your sound all the time, or for times when you when to play quietly while still achieving the tone of a cranked amp, similar to what the Lovepedal Champer does with the Fender Champ sound or the Lemon Drop does with a Vox sound.
I wouldn’t call the Bluesbreaker pedal a pre-amp or anything, it’s a proper overdrive pedal, just don’t expect the balls you’ll get from a lot of other pedals. It still sounds great though!
Marshall Bluesbreaker Wiring Schematic
The link to jump straight to the stripboard layout is above, or just scroll down manually. For those interested, I also have the wiring schematic here as well. This way if you want to make any modifications or you are having trouble with debugging your guitar pedal build, you have as much information as possible.
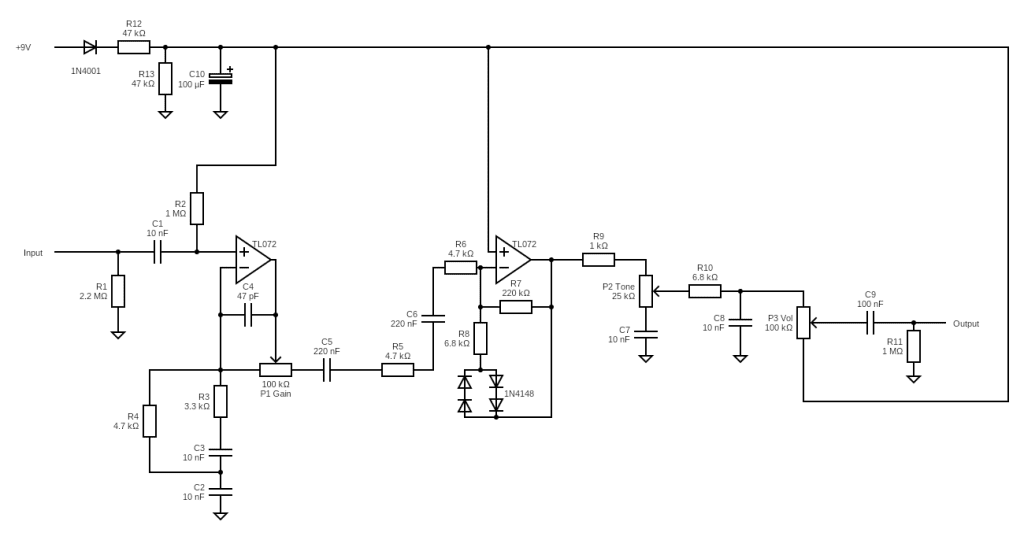
I used a combination of sources for the schematic here, as well as comparing it to the stripboard layout from Tagboard Effects. I’m confident it’s accurate, although there were some notes on some schematics about alternative values for some components.
Here’s the wiring diagram:
Click on the schematic to enlarge it.
And here’s the bill of materials.
| Notes | ||
|---|---|---|
| R1 | 2.2M | |
| R2 | 1M | |
| R3 | 3.3K | |
| R4 | 4.7K | |
| R5 | 4.7K | |
| R6 | 4.7K | |
| R7 | 220K | |
| R8 | 6.8KK | |
| R9 | 1K | |
| R10 | 6.8K | |
| R11 | 1M | |
| R12 | 47K | |
| R13 | 47K | |
| C1 | 10nF | |
| C2 | 10nF | |
| C3 | 10nF | |
| C4 | 47pF | |
| C5 | 220nF | |
| C6 | 220nF | |
| C7 | 10nF | |
| C8 | 10nF | |
| C9 | 100nF | |
| C10 | 100uF | Polarised |
| IC | TL072 | |
| D1-D4 | 1N4148 | |
| D5 | 1N4001 | |
| P1 | 100K Lin | Gain potentiometer |
| P2 | 25K Lin | Tone potentiometer |
| P3 | 100K Log | Volume potentiometer |
| Jacks, power supply, etc. | Don't Forget | The stuff you usually use. |
There’s actually not a lot special about this circuit. An initial drive stage that cranks the signal before going into another drive stage with some clipping, and that’s mostly it (other than tone and volume control of course).
There’s obviously a lot of tone shaping happening throughout the circuit, particularly in that first drive stage. As is standard with pedals like this, especially ones with two gain stages, we see coupling capacitors keeping signals separate.
If you want to fiddle around with this circuit, there’s quite a lot you can do while still keeping with the same vibe of the Marshall Bluesbreaker circuit. Obviously this stuff will change the sound quite a bit though:
- Increase the gain by changing the values of R3, R4, or P1. I don’t know how the op-amp will respond to this, and whether you’ll get too much compression or op-amp clipping, but it’s worth playing with. If you run into problems, try a different op-amp.
- Change up the clipping diodes and/or try an asymmetrical clipping set up for a more organic sound.
- Adjust the amount of gain in the second stage by changing values of R7 or R8. Again, I don’t know how the op-amp will respond to this.
Marshall Bluesbreaker Stripboard Layout
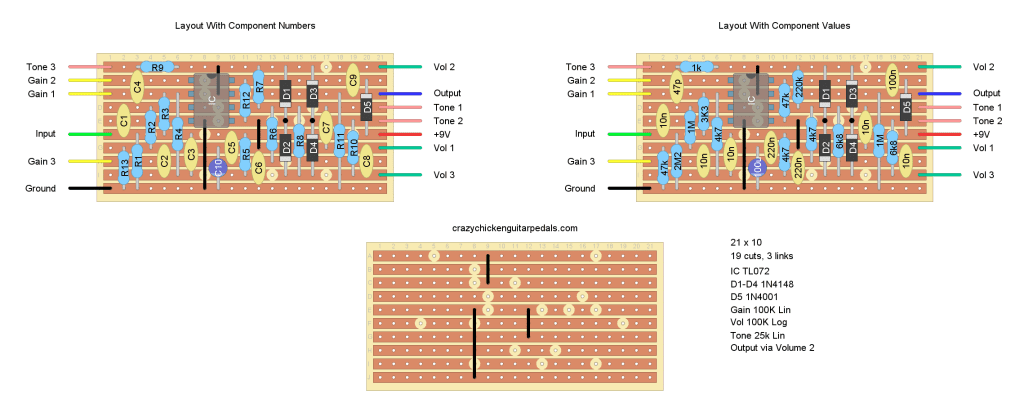
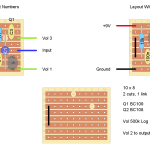
As mentioned, I got this layout from Tagboard Effects. I’ve redone the layout so that you can see it with component values on the right and component numbers on the left, in case you want to compare it to the schematic, make modifications, or debug.
This is a wide layout, but not overly crowded, so experienced builders shouldn’t have too much trouble.
Be aware that D1/D2 and D3/D4 share a hole. This can be a bit tight, but they’ll fit if you’re using standard stripboard.
Here’s the Marshall Bluesbreaker pedal stripboard layout:
Click on the diagram to enlarge it.
My Experience Building The Marshall Bluesbreaker Pedal
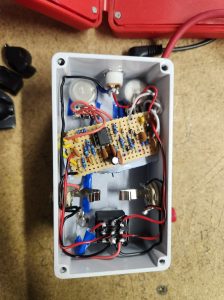 This was one of those guitar pedal builds that just worked out for me. It worked the first time and I got it boxed up with no problems.
The biggest challenge is that it was a little bit tight fitting it into the box. The stripboard is almost as wide as a 125B style enclosure, not leaving a lot of room for potentiometer wires. You can see in the picture I had to put the stripboard at an angle. At the time of boxing up the pedal, it didn’t occur to me to try having the stripboard in there length-wise, but it probably wouldn’t have worked anyway because I hadn’t done the potentiometer wiring to a length that would accommodate that.
Potentiometer wiring in mind, my biggest suggestion is to go long with your pot wires. This will allow you to have them come up and over the stripboard, rather than to the side, making everything fit a little bit better than how I got it.
Also keep in mind that there are 19 cuts in this build; that’s quite a few! When prepping your board, double check cut positions, then check again.
Other than that, as mentioned, this was a surprisingly easy guitar pedal build, despite the high-ish amount of components. Obviously it’s not a beginner DIY guitar pedal or anything, but something that can be tackled by someone with a few pedals under their belt. It’s not too crowded.
How Does The Marshall Bluesbreaker Sound?
As mentioned, if you’re looking for a pedal with super high gain and a crazy overdriven sound, the Bluesbreaker isn’t for you. But if you’re looking for some great tone with the sound of a naturally overdriven amp, the Bluesbreaker is a good choice.
Personally, I love higher pedals with a lot more drive, but when you have the power, it’s easy to just crank the knobs all the way up and overdo it. The ceiling on the Bluesbreaker is pretty low, so you can’t overdo it. It forces some restraint and that’s a good thing sometimes.
Others have mentioned that Marshall’s Bluesbreaker pedal doesn’t sound like the 1962 Marshall combo amp that inspired it, but that doesn’t really matter. Inspiration is one thing, final sound is another. With that, I didn’t feel like the Bluesbreaker felt or sounded as bass heavy as many Marshall amps do, which is something I really liked. The variation and dynamics of tone you get out of this thing are great.
As mentioned though, what this pedal is best at is adding a sensible amount of overdrive to your sound. It’s just a little bit of grit and breakup that, personally, I think will make you sound like a real pro, rather than just turning everything all the way up and hoping for the best.
Related posts:
 Lovepedal Champ On Stripboard
 Ibanez Tube Screamer (TS808) On Stripboard
 Lumpy’s Tone Shop Lemon Drop On Stripboard
 Building And Modding A Tube Screamer On A Breadboard
 Escobedo Harmonic Jerculator On Stripboard
 Lovepedal Purple Plexi On Stripboard
 ZVEX Super Hard On On Stripboard
 Vox Tone Bender On Stripboard
 Catalinbread Karma Suture On Stripboard
 Colorsound One Knob Fuzz On Stripboard
