The Escobedo Harmonic Jerculator is a wonderful little fuzz circuit that packs plenty of punch.
This pedal is based on the classic fuzz pedal from Interfax called the Harmonic Percolator. The Harmonic Percolator isn’t made any more, and the geranium transistors used for it are hard to find these days, so the Harmonic Jerculator was developed as a great alternative. Rather than using geranium transistors, this pedal uses silicon, which is more reliable. And the transistors used are a lot easier to find!
Personally, I love a fuzz pedal. They’re usually quite simple circuits that still create an awesome sound and tone.
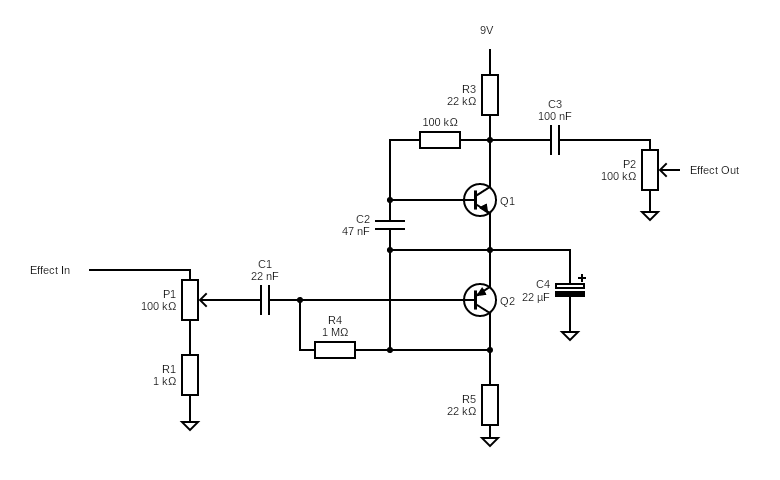
Let’s take a look at the Harmonic Jerculator wiring schematic before I move on to the strip board layout.
Harmonic Jerculator Wiring Schematic
Here’s the schematic for the Harmonic Jerculator.
Click on the schematic to enlarge it.
And here’s the bill of materials.
| Notes | ||
|---|---|---|
| R1 | 1K | |
| R2 | 100K | |
| R3 | 22K | |
| R4 | 1M | |
| R5 | 22K | |
| C1 | 22nF | |
| C2 | 47nF | |
| C3 | 100nF | |
| C4 | 22uF | |
| Q1 | 2N3904 | |
| Q2 | 2N3906 | |
| P1 | 100K Lin | Harmonics potentiometer |
| P2 | 100K Log | Balance potentiometer |
| Jacks, power supply, etc. | Don't Forget | The stuff you usually use. |
Honestly, it’s pretty similar to more than a few fuzz pedals out there, but with some key differences. An interesting thing here is the use of both PNP and NPN transistors. In the original Harmonic Percolator, both negative and positive ground transistors were used (so I’m told), which added to its unique sound. I imagine that this set up is an attempt to get that unique tone.
You can take this basic circuit and change up some values to see what happens.
I won’t provide a full analysis of the circuit, but a few things you may want to modify for a different sound include:
- Changing out the transistors. Keep in mind one is a NPN and one is a PNP transistor.
- Add a tone control after C3 and before P2. A simple low or high pass filter may work here (I haven’t tried it though).
Harmonic Jerculator Stripboard Layout
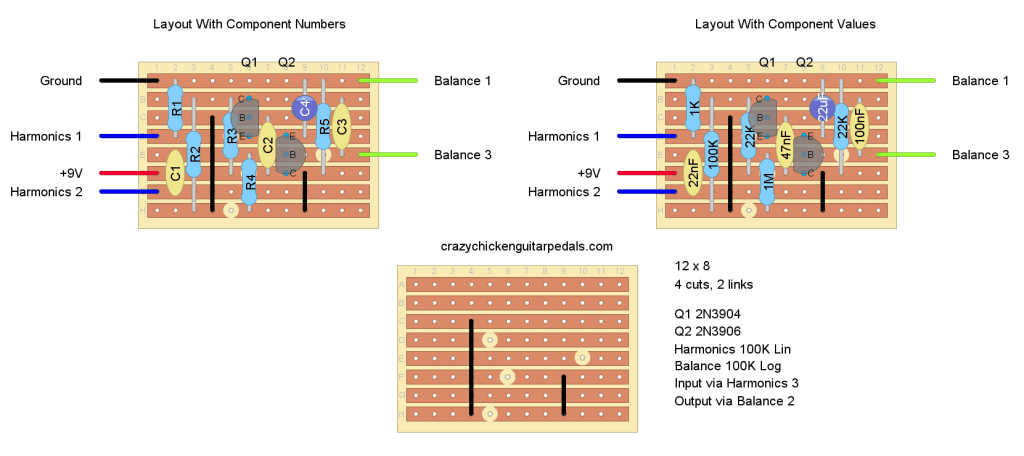
The strip board layout for the Harmonic Jerculator is relatively simple. This is the layout that you can find at Tag Board Effects (credit where credits due!).
I’ve redone the layout to show it both with component numbers (as per the schematic above) and with the component values. If you just want to follow along and make the pedal, use the layout with component values, if you’re looking to make modifications, use the layout with numbers so you can compare it to the original diagram.
After you’re done with your Harmonic Jerculator, find your next guitar pedal build.
Check it out.
Click on the diagram to enlarge it.
My Experience Building The Harmonic Jerculator
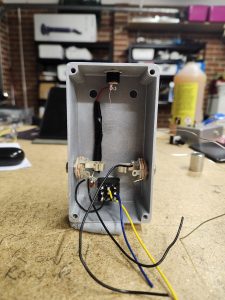 This was a fun little build. It’s an easy build, which is why I’ve put it on my list of beginner DIY guitar pedal builds.
Honestly, there wasn’t anything especially tricky with making this guitar pedal. It’s not a particularly crowded strip board, so it’s easy to hide behind any mistakes. Admittedly, I did get a short between the 9 volt and the Harmonics 2 line due to some sloppy soldering. This caused a loud squealing noise, but it was an easy enough to fix by sliding a knife between the two joints.
The only challenge I had with the build itself is that I prefer to use sockets for my transistors (and IC’s), which takes up a little more room than just soldering the transistor in place. This made the fit with C2 between the two transistors a little snug. It’s not a big deal, just an observation.
Another point of interest is that both the input and output are through potentiometers. It’s a little unusual, but again, not tricky to do.
How Does The Harmonic Jerculator Sound?
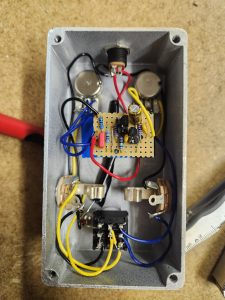 I tried the Harmonic Jerculator with a Fender Stratocaster into a solid state Orange amplifier.
This thing gets loud very quickly. I love the sound, but I think I had trouble getting the full range of noises out of this pedal because I didn’t want to piss the neighbours off too much.
The harmonics knob adjusts the total amount of fuzz, but it also gives some more volume too; the more fuzz, the louder this thing gets. The balance knob is volume, but it likes to interact with the harmonics a bit too. Blasting this thing (volume-wise) sounds great. Don’t get me wrong, even playing with the volume down a little bit sounds good, but the noises really come into their own with some power behind them.
Adjusting the volume directly on the guitar while cranking the knobs up on the pedal allows some of the full potential of this pedal to come out, but it really relies on a full guitar signal for the Harmonic Jerculator to be fully appreciated. That being said, the pedal responds well to changes in volume and tone from the guitar itself (whether through attack or volume/tone knobs), completely changing the level of fuzz and tones being produced by the pedal.
But all of that is if you like everything at full blast…
Dialing things back a little bit, with harmonics at about 12-2 o’clock, gives some nice mild fuzz with some great Hendrix-like tones to it. Sure, Hendrix used a Fuzz Face, but yeah, it’s a classic fuzz sound.
On the lower end of things, with the fuzz dialed right back, the Harmonic Jerculator gives the guitar some warmer tones, similar to a good tube amp, without any overt fuzz. It just sounds like some lighter soft clipping.
All that being said, a lot of this relies on what’s going on with the volume too!
How The Harmonic Jerculator Turned Out
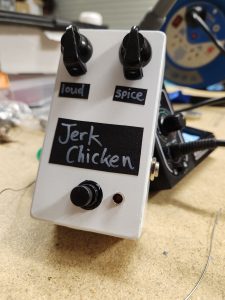 I think this pedal build turned out really well!
As I mentioned, it sounds great. It’s been awhile since I’ve done a build, so it was nice to get back into the swing of things with a more basic build. Fuzz pedals are great that way.
I’ve decided to name this pedal the Jerk Chicken. Sure, it’s a Harmonic Jerculator clone, but half the fun of building your own guitar pedals is doing the case and coming up with a came. And, of course, it’s a nice simple case for a simple pedal.
I still need to do a recording of how it sounds. It’s on my to do list. Check back soon.
Related posts:
 Vox Tone Bender On Stripboard
 Colorsound One Knob Fuzz On Stripboard
 Lovepedal Purple Plexi On Stripboard
 ZVEX Super Hard On On Stripboard
 Lovepedal Champ On Stripboard
 EarthQuaker Devices Acapulco Gold On Stripboard
 Greer Amps Green Giant On Stripboard
 Catalinbread Karma Suture On Stripboard
 Catalinbread Naga Viper On Stripboard
 Ibanez Tube Screamer (TS808) On Stripboard
