Well, this was a fun pedal to build. It was a big build, but well worth it to make such a famous pedal. And one that sounds so good too.
We’re all likely familiar with the Big Muff sound and, if you’re not, just check out music by Pink Floyd, White Stripes, Carlos Santana, and more. It’s a world famous fuzz pedal that’s highly sought after. Sure, these pedals are plentiful, and there are plenty of variations by both Electro-Harmonix and others, but, as with most of my DIY guitar pedal builds, I’m aiming for the original specs. And I’m pretty sure that’s what I’ve found here.
The design for the Big Muff has been around for more than 50 years now, so I can’t be 100% sure that this is the original schematic, and not something that’s gone through 100 different hands with slight changes each time. But what I do know is that this pedal sounds great and it’s a lot of fun to build.
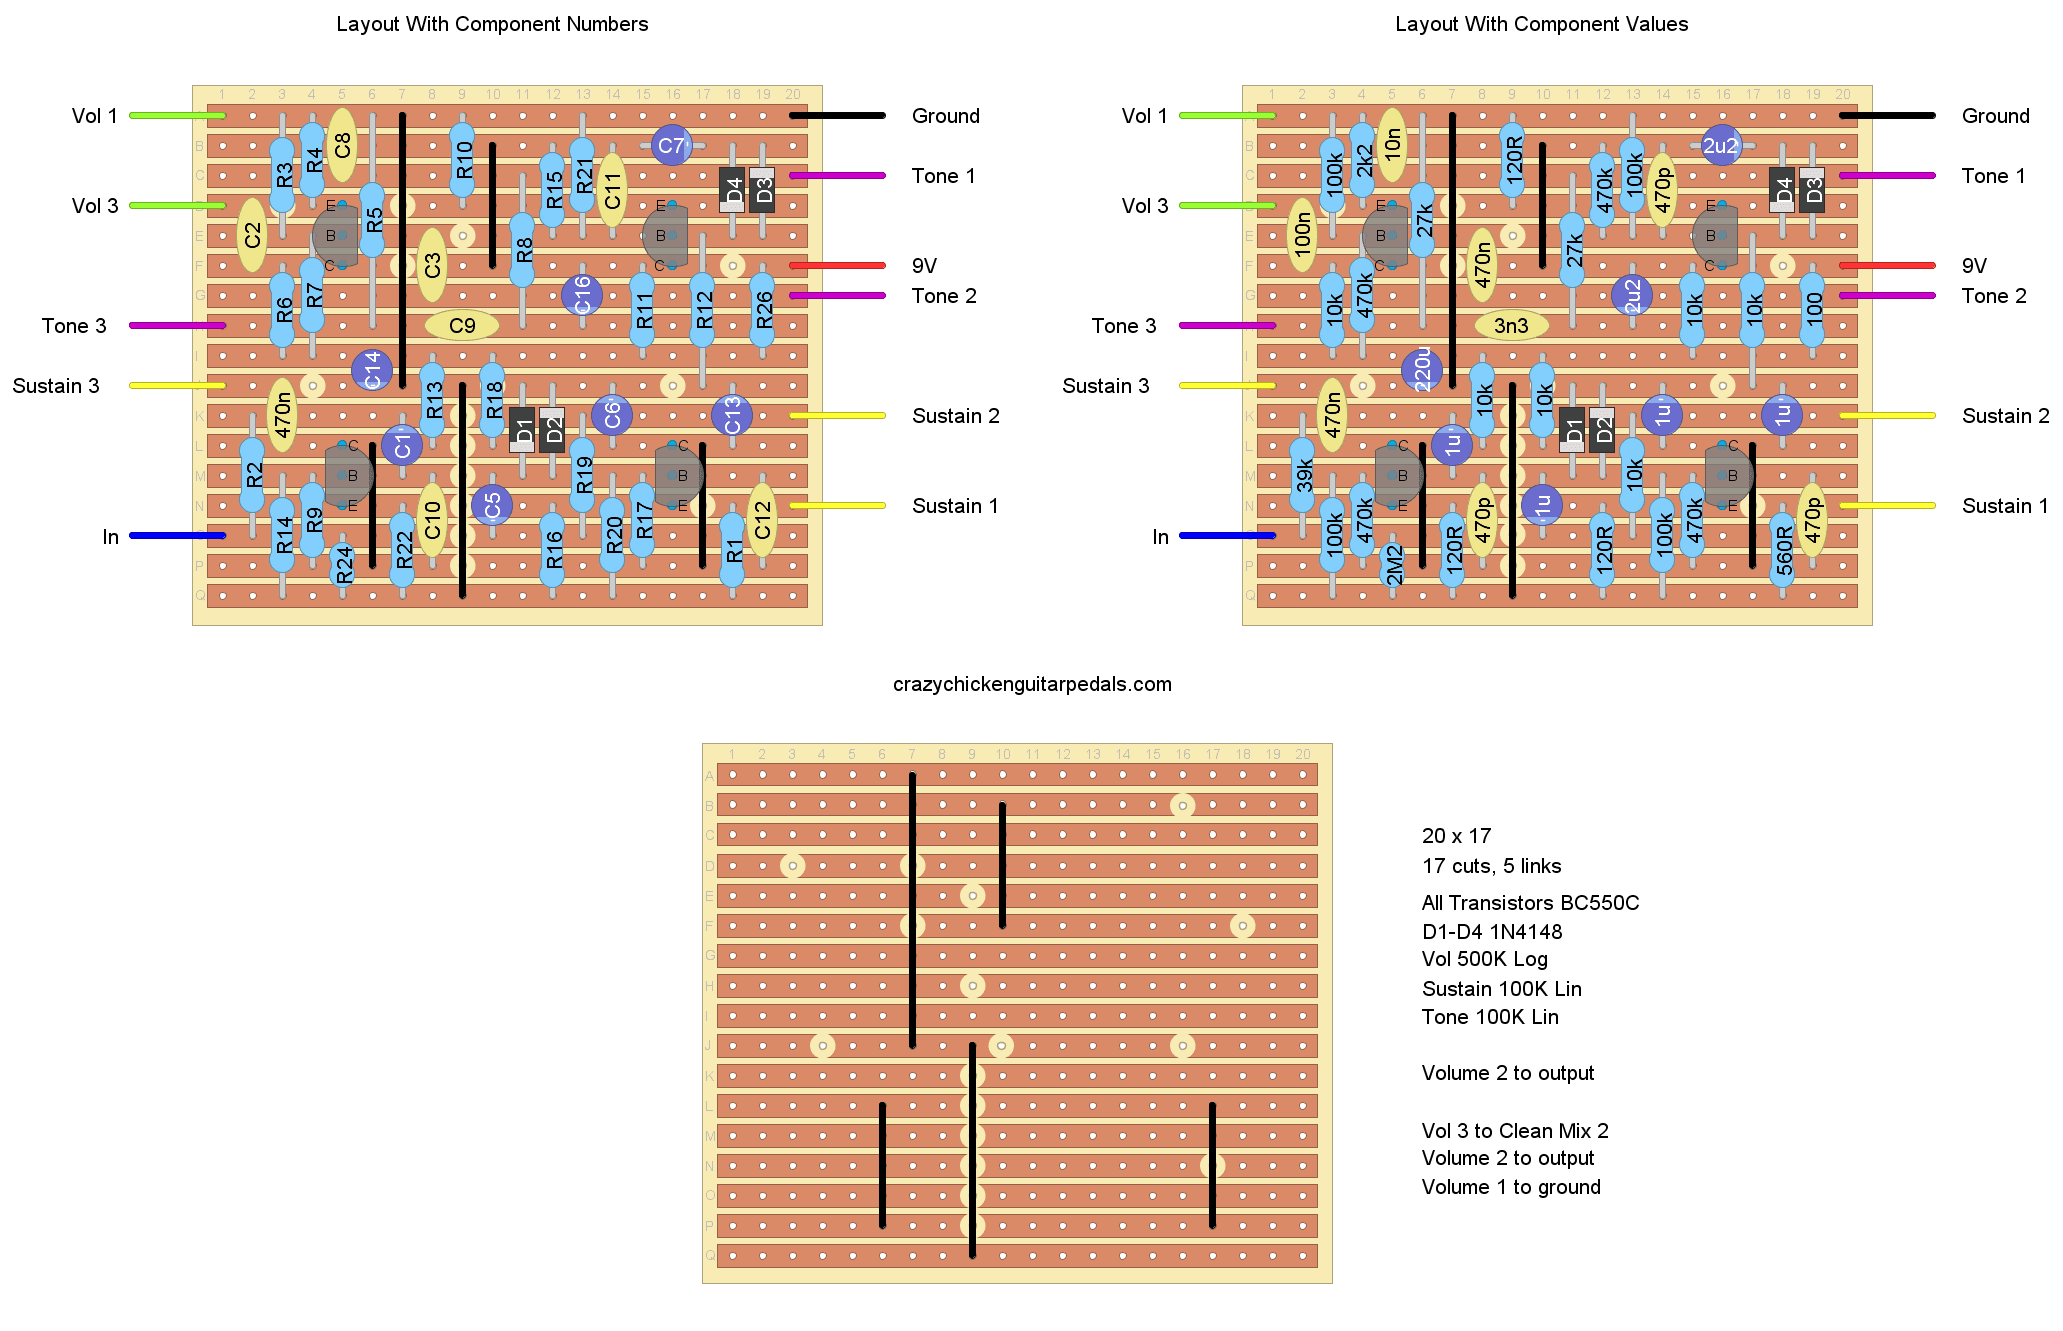
Compared to a lot of DIY guitar pedals on stripboard, this is a relatively big build. Something like the Ibanez Tube Screamer is a pretty big piece of stripboard. This is bigger. At 20 x 17, this board will fit into a 125B style enclosure. It’s far from a tight fit, but it also doesn’t leave a lot of room either. For reference, 21 holes wide is about as big as you can go with a 125B enclosure; I learned this when I made my Marshall Blues Breaker on stripboard and had to slightly angle the board!
But all in all, this isn’t a pedal build for newbies but, despite its size, it’s not that hard a build. There is a lot of space there, so it’s hard to make mistakes. But it is easy to miss a component or two, so go slow.
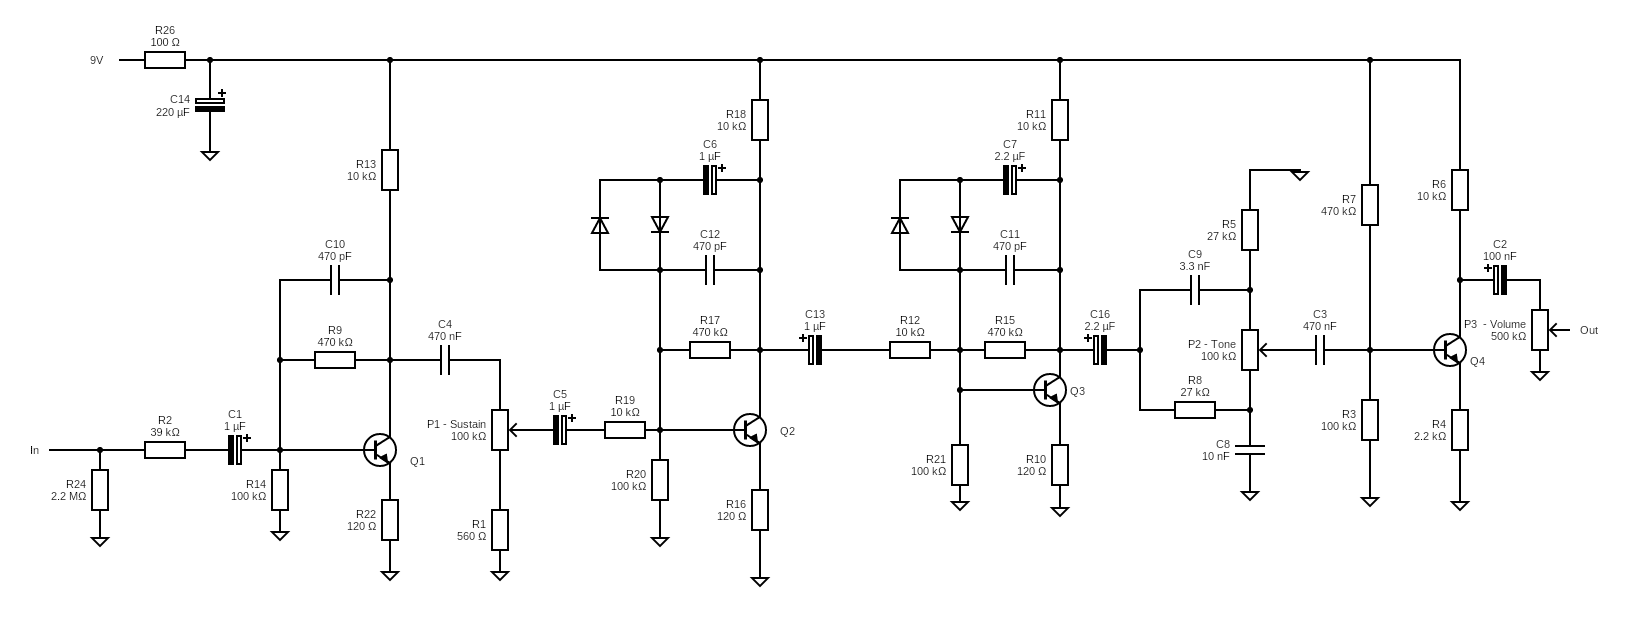
Jump straight to the stripboard layout if you’re impatient, otherwise check out the schematic below.
Electro-Harmonix Big Muff Wiring Schematic
The schematic for the Big Muff is a pretty big one, but it’s really not that intimidating in a lot of ways. Basically speaking, there are input and output transistors to boost the signals going in/out. In between all of this are two more amplification stages with some diode clipping (and I imagine transistor clipping as well). Then tone control of course…
When I put it simply like that, it sounds like the engineering behind the Big Muff isn’t a big deal, but it is! The two clipping stages add layers to the sound that can’t be heard anywhere else!
Here’s the wiring diagram:
Click on the schematic to enlarge it.
And here’s the bill of materials.
| Notes | ||
|---|---|---|
| R1 | 560R | |
| R2 | 39K | |
| R3 | 100K | |
| R4 | 2.2K | |
| R5 | 27K | |
| R6 | 10KK | |
| R7 | 470K | |
| R8 | 27K | |
| R9 | 470K | |
| R10 | 120RK | |
| R11 | 10K | |
| R12 | 10K | |
| R13 | 10K | |
| R14 | 100K | |
| R15 | 470K | |
| R16 | 120R | |
| R17 | 470K | |
| R18 | 10K | |
| R19 | 10K | |
| R20 | 100K | |
| R21 | 100K | |
| R22 | 120R | |
| R23 | NONE | |
| R24 | 2M2K | |
| R25 | NONE | |
| R26 | 100R | |
| C1 | 100uF | Polarised |
| C2 | 100nF | |
| C3 | 470nF | |
| C4 | 470nF | |
| C5 | 1uF | Polarised |
| C6 | 1uF | Polarised |
| C7 | 2.2uF | Polarised |
| C8 | 10nF | |
| C9 | 3.3nF | |
| C10 | 470pF | |
| C11 | 470pF | |
| C12 | 470pF | |
| C13 | 1uF | Polarised |
| C14 | 220uF | Polarised |
| C15 | NONE | |
| C16 | 2.2uF | Polarised |
| Q1, Q2, Q3, Q4 | BC5550C | |
| P1 | 100K Lin | Sustain potentiometer |
| P2 | 100K Lin | Tone potentiometer |
| P3 | 500K Log | Volume potentiometer |
| Diodes | 1N4148 | |
| Jacks, power supply, etc. | Don't Forget | The stuff you usually use. |
I’ve already talked about some cool things in this circuit, but my favourite thing is the unique Big Muff tone control, which creates a cool mid-scoop. You can read more about it in the article I’ve just linked.
Since there are four distinct sub-circuits here, there are also plenty of coupling capacitors throughout to stop DC leakage from one area to another. These are C1, C5, C13, C16, and C2; if you’re looking to design something big like this, there’s something to learn here!
I haven’t done it, but I’d be curious to see what a Big Muff sounds like with only a single clipping stage. Probably not nearly as good, but perhaps something to map out on a breadboard.
Electro-Harmonix Big Muff Stripboard Layout
Take your time with this build, it’s easy to get lost in the size. But all in all, if you’re patient with building a Big Muff, it’s really no trouble.
As always, you can see the stripboard layout for the Big Muff with component values on the right; just follow that if you just want to build the thing. If you’re looking to swap out parts, I’ve provided component numbers that line up with the schematic on the left – go for it!
Click on the diagram to enlarge it.
My Experience Building The Electro-Harmonix Bigg Muff Pedal
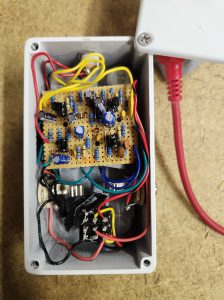 As mentioned, the stripboard for the Big Muff fits into a 125B style enclosure, just barely. You can see in the picture there’s room, but not room for much more!
All of this made boxing this pedal a little fiddly, but not terribly hard as long as patience persisted.
One thing I did do that was a stuff up was swap the tone and sustain controls, but I caught it quick and fixed the problem.
Better builders than me would probably make the internal wiring for this pedal look prettier, or you could opt for a slightly larger enclosure – this would make the enclosure wiring easier and make it more akin to a traditional Big Muff, but there’s also something to be said about fitting it all in.
How Does The Electro-Harmonix Big Muff Sound?
 Well, it sounds like a typical Electro-Harmonix Big Muff!
It’s a layered, fuzzy sounding pedal. The sustain knob doesn’t really change the amount of fuzz but instead, does what it says and changes the sustain of the sound – i.e. it’s always fuzzy, but how long that fuzz rings out is the thing.
I think this pedal really comes into its own with the tone control. It can get quite doom-like with more bass but really great tones a fuzz out of the more treble settings. For such a big circuit, it’s actually a pretty simple sound that, ironically, has a lot of dynamics to it.
I would caution just turning everything up to 11 here. This may be fun for the sustain setting, but really dial in the tone to find something you like. Some people don’t like mid-scoops, so you may have to commit to a lot of bass or a lot of treble.
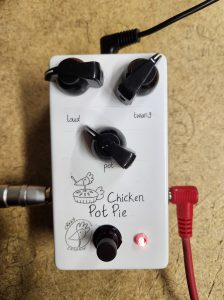
I decorated my Big Muff clone with some decals and called it the Chicken Pot Pie. The decals turned out great (although I’m still new at decals). Keep the design simple.
Related posts:
 Escobedo Harmonic Jerculator On Stripboard
 Vox Tone Bender On Stripboard
 Catalinbread Karma Suture On Stripboard
 Colorsound One Knob Fuzz On Stripboard
 Greer Amps Green Giant On Stripboard
 Ibanez Tube Screamer (TS808) On Stripboard
 Lumpy’s Tone Shop Lemon Drop On Stripboard
 Marshall Bluesbreaker On Stripboard
 Catalinbread Naga Viper On Stripboard
 EartherQuaker Devices Speaker Cranker On Stripboard
