The Naga Viper by Catalinbread is a treble booster pedal modelled on the somewhat legendary Dallas Rangemaster treble booster popularised by so many guitarists (especially out of England) in the 1960’s and ’70’s. These were the days before overdrive and distortion pedals; sure they had fuzz pedals (here’s a history of fuzz pedals if you’re interested), but the way they got their sound back then was by simply cranking their amps as high as possible. In a lot of British amps like Marshalls, when turned up all the way, too much bass comes through, creating a bit of a muddy sound. Boosting the treble into an amp like this (with a Rangemaster way back when), created a much better tone.
So, a Naga Viper like this looks to create a similar effect to the original Rangemaster treble booster. It’s not really a pedal you’ll be using on its own, but will work well when combined with other pedals, especially overdrive pedals like the Ibanez Tube Screamer, which tends to be a bit heavy on the bass anyway. With that, use the Naga Viper as a more traditional boost pedal, similar to the ZVEX Super Hard On when you need that extra push for leads and solos.
Catalinbread’s Naga Viper comes with three knobs: heat, which is gain, giving the slightest amount of breakup when up high; boost, which acts as the output level for the pedal (i.e. volume); and most importantly, range, which controls how what frequencies are boosted. Turn the range control all the way up, and you’re boosting only treble frequencies; all the way down, and you’re boosting a fuller range of frequencies, including some bass.
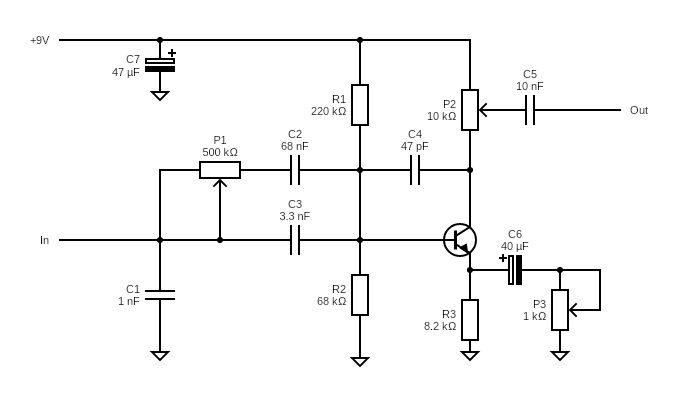
Catalinbread Naga Viper Wiring Schematic
This is a pretty simple schematic, which is why I’ve also chucked this pedal into my easy to make guitar pedals section. A boost pedal is a pretty basic set up if you understand how transistors work, the fun part is what else is going on the pedal to regulate what frequencies are getting through and therefore boosted.
Obviously I’m presenting the stripboard layout for the pedal later on, but if you’re curious about how the pedal works, have a look at the wiring schematic below. You can also use this as a jumping off point for modifications if you’re interested.
Here’s the wiring diagram:
Click on the schematic to enlarge it.
And here’s the bill of materials.
| Notes | ||
|---|---|---|
| R1 | 220K | |
| R2 | 68K | |
| R3 | 8.2K | |
| C1 | 1nF | |
| C2 | 68nF | |
| C3 | 3.3nF | |
| C4 | 47pF | |
| C5 | 10nF | |
| C6 | 40uF | Polarised |
| C7 | 47uF | Polarised |
| Q1 | 2N2222A | |
| P1 | 500K Log | Range potentiometer |
| P2 | 10K Lin | Boost potentiometer |
| P3 | 1K Lin | Heat potentiometer |
| Jacks, power supply, etc. | Don't Forget | The stuff you usually use. |
Not much going on there, is there?
It’s really just a boost with a bit of tone control prior to the signal going through the transistor. That tone control happens prior to the amplification because, well, you’re trying to boost certain signals. Take away the signals you don’t want first, then boost what’s left. The other way around (i.e. amplify then tone control), and you’re boosting everything then removing tones. Slightly different.
The only thing you may want to fiddle with on this circuit is the value of P3 (the heat pot). This will adjust the amount of gain that the transistor is giving, and you may be able to make this thing louder (although you’ll start to get some transistor clipping as well).
Of course you can also change the transistors, but this would probably be more useful if you were aiming to get some clipping out of it.
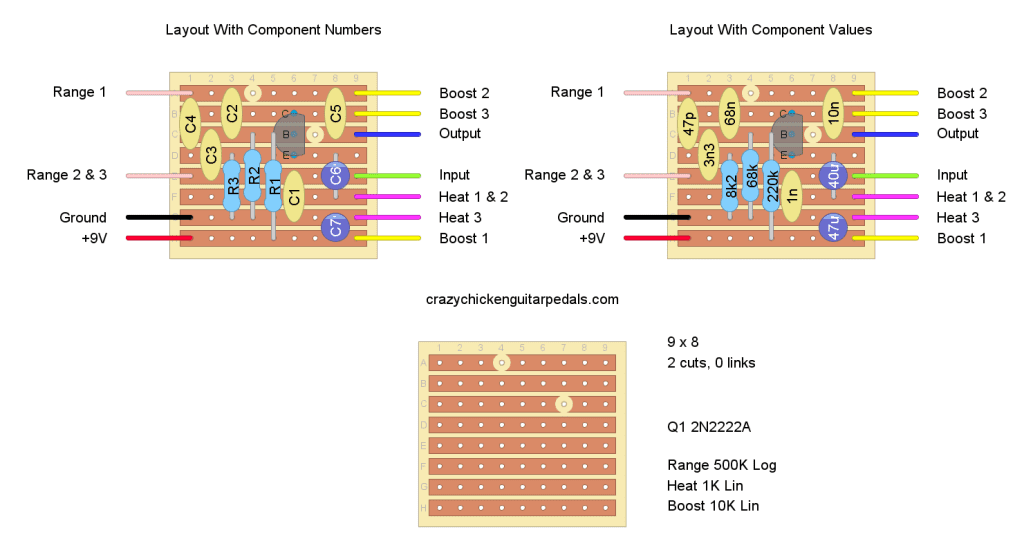
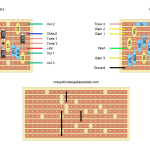
Catalinbread Naga Viper Stripboard Layout
Here’s the Catalinbread Naga Viper pedal stripboard layout. You’ll see on the left is the layout with numbered components (if you want to compare it to the schematic above), on the right is the layout with component values if you just want to build the thing. At the bottom is the blank board so you can easily see where cuts and links are.
This is a pretty simple pedal build. Only three resistors!
Click on the diagram to enlarge it.
My Experience Building The Catalinbread Naga Viper Pedal
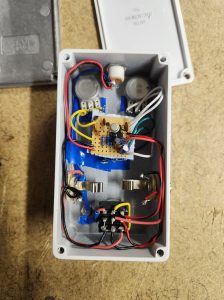 This was a fun and fast DIY pedal build that worked first time. As noted, there are only three resistors… what I also liked about it is although it’s a small and simple layout, there are three potentiometers to work with, giving the pedal some stuff to adjust. This is different from a lot of other easy guitar pedal builds, like the Acapulco Gold by EarthQuaker Devices, which only has a single knob and it’s really just volume. The Acapulco Gold is a great pedal, don’t get me wrong, but it’s not really to my style personally.
But seriously, there really wasn’t anything that came up when I was building this pedal. There aren’t a lot of components and it wasn’t particularly crowded so I didn’t have to be too careful. With that in mind, I managed have this thing build very quickly; it probably took me longer to drill out the box than it did to actual solder the board.
But if you’re new to pedal building, take your time with it!
How Does The Catalinbread Naga Viper Sound?
All in all, I like it, but it doesn’t really do much on its own.
The Naga Viper is a boost pedal: it makes things go loud. While it’s doing that, it also intentionally cuts out bass frequencies, pushing treble frequencies that are often lost when amps are driver too hard.
With that in mind, there’s a few ways this pedal can be used.
Firstly, it can be used on its own going into an amp’s clean or dirty channel. Going into the clean channel, you likely won’t hear much besides the very slight breakup given on higher pedal settings. Into the dirty channel, the Naga Viper works well as an always on pedal (as was with the Rangemaster), pushing the treble frequencies in the mix and removing some of the mud.
From there, you can also put this pedal before others (especially overdrive, distortion, fuzz, etc.), boosting the signal before it goes to these pedals. This is how the original Rangemaster was intended to be used, like described above. Again, you’ll get something similar to the Naga Viper going into an amp’s dirty channel, helping to reduce some of the bud created by overdrive.
The other option for the use of the Naga Viper is to put it after everything else, which is traditionally how you’d use a boost pedal. This can be a bit unpredictable and will depend on your specific set up. If you want to use this as a general boost, it may work well though.
Obviously the Naga Viper by Catalinbread is far from transparent (unlike the SHO), you’re going to get a change of tone here, but that may be for you. Enjoy it!
Related posts:
 ZVEX Super Hard On On Stripboard
 Escobedo Harmonic Jerculator On Stripboard
 Lovepedal Purple Plexi On Stripboard
 Vox Tone Bender On Stripboard
 Lovepedal Champ On Stripboard
 EarthQuaker Devices Acapulco Gold On Stripboard
 Greer Amps Green Giant On Stripboard
 Catalinbread Karma Suture On Stripboard
 Colorsound One Knob Fuzz On Stripboard
 Marshall Bluesbreaker On Stripboard
