 Ohm’s Law is one of the basic electrical equations that will help you better understand what’s happening in electrical circuits and why certain components are in guitar pedals. Although you probably just want to start putting things together and making some noise, you’ll better be able to troubleshoot guitar pedal builds and designs if you understand what everything is doing, and you’ll better understand what everything is doing if you understand Ohm’s Law.
The good news is that Ohm’s Law is actually pretty simple. There is a mathematical equation involved, but it couldn’t be easier.
But first, a little history.
Ohm’s Law is named after Georg Ohm, who first wrote of his discovery in 1827. Ohm’s Law describes the relationship between current, voltage, and resistance and how everything remains constant. And yes, Ohm “discovered” the law, he didn’t invent it. He didn’t invent it because Ohm’s Law exists whether or not we’re aware of it. But, since we’re now aware of it, we can use it!
What Is Ohm’s Law
Ohm’s Law states that:
Because of this, if you know two numbers, you can find out the first using pretty simple maths.
Why does Ohm’s Law work? Electricity is often described as similar to water flowing through a pipe. Voltage is similar to the pressure in a pipe, the current is the speed that the water is flowing, and the resistance is how big the pipe is (a narrower pipe is more resistance). To get more water through the pipe, you can increase the pressure, speed up the flow, or make the pipe bigger.
All of that is a basic understanding of course, but hopefully you get the idea. It will become clearer when we run through some applications of Ohm’s Law, both in general and as it is related to guitar pedals.
Using Ohm’s Law To Calculate Current, Voltage, And Resistance
Obviously just knowing Ohm’s Law only counts for so much. If you can’t use it, it’s kind of useless, isn’t it? The following are some examples of using Ohm’s Law to calculate current, voltage, and resistance. These three examples are fairly dry, but I’ll go into three more examples that will help you understand why being able to calculate these numbers is important.
With that in mind, remember that these are simple circuits that are presented in isolation. Most circuits have multiple components, sections, and branches. When you’re looking at a simple circuit, these things may be obvious, but starting with the basic calculations helps when things get more complex.
Calculating Current Using Ohm’s Law
As I mentioned, if you know two of the numbers in the Ohm’s Law formula, you can figure out the third. Often we know what the voltage is and the value of a resistor, so it’s a simple matter of finding the current.
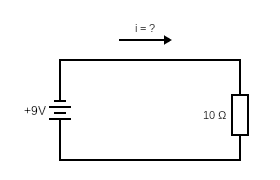
In the diagram above, let’s assume you’re using the standard 9 volt battery that’s used for most guitar pedals. All your pedal does is light up a light with a resistance of 10 ohms. Yeah, that’s kind of a boring pedal, but you have to start somewhere, right?
So we know:
E = 9
I = ?
R = 10
If E = IR, then I = E/R so:
I = 9/10 = 0.9
The current in the circuit is 0.9 amps.
Calculating Resistance Using Ohm’s Law
Here’s another simple circuit where the voltage and current is known. Once again I’ll use 9 volts as it’s what most guitar pedals use.
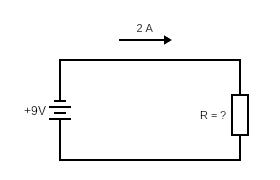
So we know:
E = 9
I = 2
R = ?
If E = IR, then R = E/I so:
R = 9/2 = 4.5
The resistance in the circuit is 4.5 ohms.
Calculating Voltage Using Ohm’s Law
You can probably see where this is going… now let’s calculate the voltage in a simple circuit when we know the resistance and current.
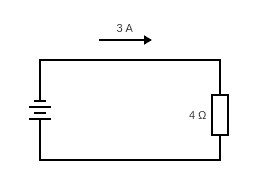
So we know:
E = ?
I = 3
R = 4
Using E = IR:
E = 3 x 4 = 12
The voltage in the circuit is 12 volts.
I wanted to make the voltage 9 volts so that it’s still the same as most guitar pedals, but that felt too obvious!
Using Ohm’s Law To Calculate Voltage Drop For Resistors In Series
I’m sure all of the above was pretty basic. That’s all basic algebra most of us learned in middle school. Let’s look at some resistors in series so we can see how voltage drops as it goes through each resistor. While this is still pretty simple, understanding how voltage drops for resistors in series will be important for understanding things like voltage dividers, op-amps, and generally supplying enough voltage to various parts of a guitar pedal. Resistors are common in guitar pedals, so understanding what they do to voltage is important.
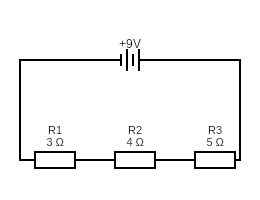
Here we have a circuit with three resistors in series. “In series” means the resistors are all lined up one after another.
For resistors in series, we can calculate the total resistance simply by adding up the resistors.
We can then use the total resistance to calculate the current using Ohm’s Law.
I = E/R = 9/12 = 0.75
Across the three resistors, the current will remain the same. This is just a fact of circuits in series. Sorry to stress it, but remember: the current remains constant for components in series.
What this means is that we can use our knowledge of the constant current to calculate the voltage drop after each resistor.
In the below, I’ll use V1 for the voltage drop across R1, V2 for the voltage drop across R2, and V3 for the voltage drop across R3.
V1 = IR = 0.75 x 3 = 2.25 volts
V2 = IR = 0.75 x 4 = 3 volts
V3 = IR = 0.75 X 5 = 3.75 volts
Since everything is now going back into ground, the voltage after it’s passed through all the resistors should drop to zero. We can check our answer by adding up the voltage drops across all three resistors. It should equal our original voltage.
V = 2.25 + 3 + 3.75 = 9 volts – we got it right!
Are you starting to see how Ohm’s Law might be helpful in designing circuits and ultimately designing guitar pedals?
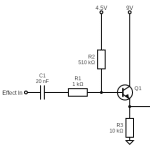
Using Ohm’s Law To Create A Voltage Divider
A voltage divider is a set of two resistors in series with a wire coming off in between the two. This is used in guitar pedals both for volume knobs and for lowering the voltage coming out of a 9 volt battery so that you’re getting the correct voltage to something like an op-amp. This will make more sense later on, but to put it simply, a voltage divider is a way to send a lower amount of voltage into a circuit.
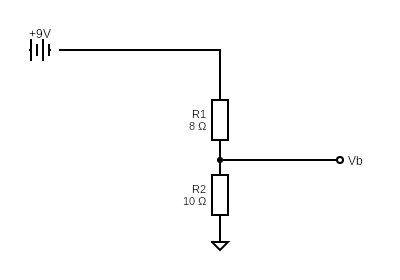
Let’s use what we learned in the last section to calculate the voltage drop across each resistor so that we know how much is being sent out to reference voltage (Vb), going to the right in the diagram.
Rtotal = 8 + 10 = 18
I = E/R = 9/18 = 0.5
So the voltage drop across the first resistor is:
V1 = IR = 0.5 x 8 = 4
So we know that we lost 4 volts across the first resistor, so to calculate Vb:
Vb = V – V1 = 9 – 4 = 5 volts.
As mentioned, creating a voltage divider is essentially how a volume knob works. A volume knob is just a potentiometer. Potentiometers are essentially just resistors in series that can be adjusted. Rotating the knob changes how much resistance there is in the first resistor and the second resistor, changing how much output voltage there is and therefore the volume.
That’s Ohm’s Law
If this is the start of your guitar pedal building journey, welcome! Perhaps this is a bit of a dry way to get started, but it is getting you started with a bit of theory, which will do you good. If you just want to jump in, check out some of my easy pedal build suggestions. If you’ve already gotten started at building guitar pedals but you want to better understand how everything works, welcome as well!
Both these ways of getting started, purely with theory or with some simple builds then understanding the components later, are great approaches.
Related posts:
 Ultimate Guide To Resistors In Guitar Pedals: What They Do And How They Work
 How High Pass And Low Pass Filters Work In Guitar Pedals
 What Is A Voltage Divider?
 Ultimate Guide To Diodes In Guitar Pedals: What They Do And How They Work
 Ultimate Guide To Transistors In Guitar Pedals: What They Do And How They Work
 Understanding Mid-Scoops And The Big Muff Tone Circuit
 How To Read A Circuit Diagram