Let’s talk switches.
I was looking through the stats for this website, and one of my most popular articles is on how to wire a 3PDT, so I’ve decided to write more switch related content. My article on the 3PDT/how to wire guitar pedal footswitches talks a little bit about other types of switch, mainly SPDT’s, but doesn’t go into much detail for them. After all, a common question when building your own guitar pedal is how to wire a footswitch. It’s not difficult, but more confusing than wiring an input jack. All of this is for guitar pedal enclosure wiring; personally I think good enclosure wiring is just as important as the actual circuit wiring. It’s a skill I’m still working on.
When making guitar pedals, other types of switches exist beyond the trusty 3PDT. These switches are used in guitar pedals and in electronics in general. They may be used to switch between types of clipping, like to swap between symmetrical and asymmetrical clipping or for a treble or bass boost. A kill switch may be put in to create a stuttering sound. There’s a lot you can do with switches.
What Does SPDT, DPDT, And 3PDT Mean?
First, let’s talk about some vernacular, because it can get confusing. If you understand the names of these switches, understanding what they do, where they’re useful, and how to wire them becomes a lot easier. Here’s what everything stands for:
- SPST: single pole, single throw
- SPDT: single pole, double throw
- DPDT: double pole, double throw
- 3PDT: triple pole, double throw
I sneaked the single pole, single throw switch in there to make it obvious what everything stands for (and I’ll discuss it a little bit); it’s just not used as much as the other types of switches.
As you’ve probably figured out, SP refers to single pole, DP refers to double pole, and 3P is triple pole. ST is single throw and DT is double throw.
So now you’re wondering: what’s a pole and what’s a throw? All of these switches, except for the SPST, are double throws, so that probably means something.
- Pole – you can think of this as the amount of circuits that the switch controls. Sure the switch may switch between two circuits (for example an effect circuit and a bypass), but it’s only sending voltage to one circuit at a time, and only coming from one input.
- Throw – is how many positions the switch has that affects circuit switches. That is to say, how many positions the switch can have at its extremes. Most double throw switches you’ve encountered likely have a top and a bottom position; one position for one state (for example one type of clipping) and one for another state (a different type of clipping). However, some DT switches have a middle position to turn off both circuits (e.g. no clipping). This is still a double throw switch; it’s often referred to as an on-off-on switch (rather than on-on for the other type of DT).
If this language is still somewhat confusing, let’s take a look at an SPDT switch.
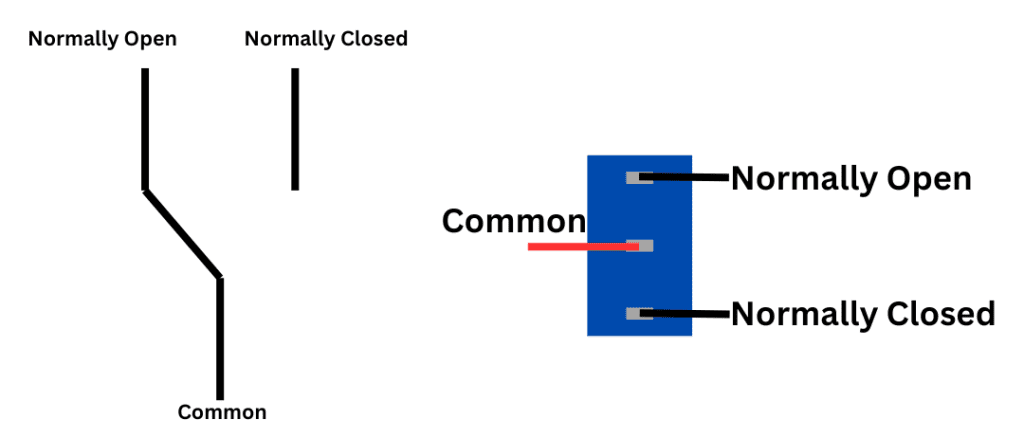
Although the contacts are labelled normally open, normally closed, and common, you can think of them as:
- Common: this is the “input connection.” Signal or voltage comes in here and it can go one of two directions.
- Normally open: this is one of the two directions the signal can go, if the switch is swung that way.
- Normally closed: the other direction the signal can go.
Again, this is an SPDT. There’s a choice between two routes to go, but it’s only coming from one, so it’s single pole.
Now that you understand what all the terms mean, I’ll go through general operation and wiring for each of these types of switches.
On-On Versus On-On-On Switches (And On-Off-On Switches)
To add another dimension here, some switches can be consider on-on, others are on-on-on, and others are on-off-on. You’ve probably encountered all of these switches at some point, but you just didn’t realise it.
To think about these switches, don’t think about a guitar pedal footswitch. Instead, think about a toggle switch.
- On-on: these switches operate in to positions, with each position having a different state; one through one circuit and another through another one. An example here is a light switch that turns on the bedroom light when flipped up and the hall light when flipped down. There’s no way to have both the lights off.
- On-on-on: these switches have a middle position, with that middle position diverting through an additional circuit. An example is a light switch that has the bedroom light on when flipped up, the hall light on when flipped down, and the kitchen light on when in the middle. You can’t have all the lights off.
- On-off-on: these switches operated in three positions, with the middle position turning off both circuits. The example for this on is the bed room light is on when the switch is up, the hall light is on when it’s down, and both are off when it’s in the middle.
To my knowledge, an on-on-on SPDT doesn’t exist. How would that work anyway? I’ve also never encountered an on-on-on 3PDT, they don’t appear to be terribly common from what I can find.
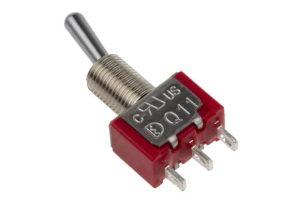
SPDT Wiring
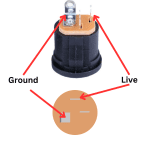
I’ve already gone through it a bit in the last section of this article in explaining poles and throws, but let’s look at it again. Here’s a wiring diagram of an SPDT as well as a picture of one:
SPDTs can come in an on-on or on-off-on configuration. As mentioned, I’m not sure how an on-on-on SPDT would work, feel free to correct me if you find one!
It’s all pretty simple, and I’ve already mentioned a few examples:
- Switching between types of clipping (as shown above)
- Switching between a high pass and low pass filter
DPDT Wiring
A DPDT gets a little more complicated than a SPDT. DPDT come in a few varieties: on-on, on-off-on, and on-on-on. on-on and on-off-on pretty much have the same wiring, but things get more complicated with an on-on-on SPDT.
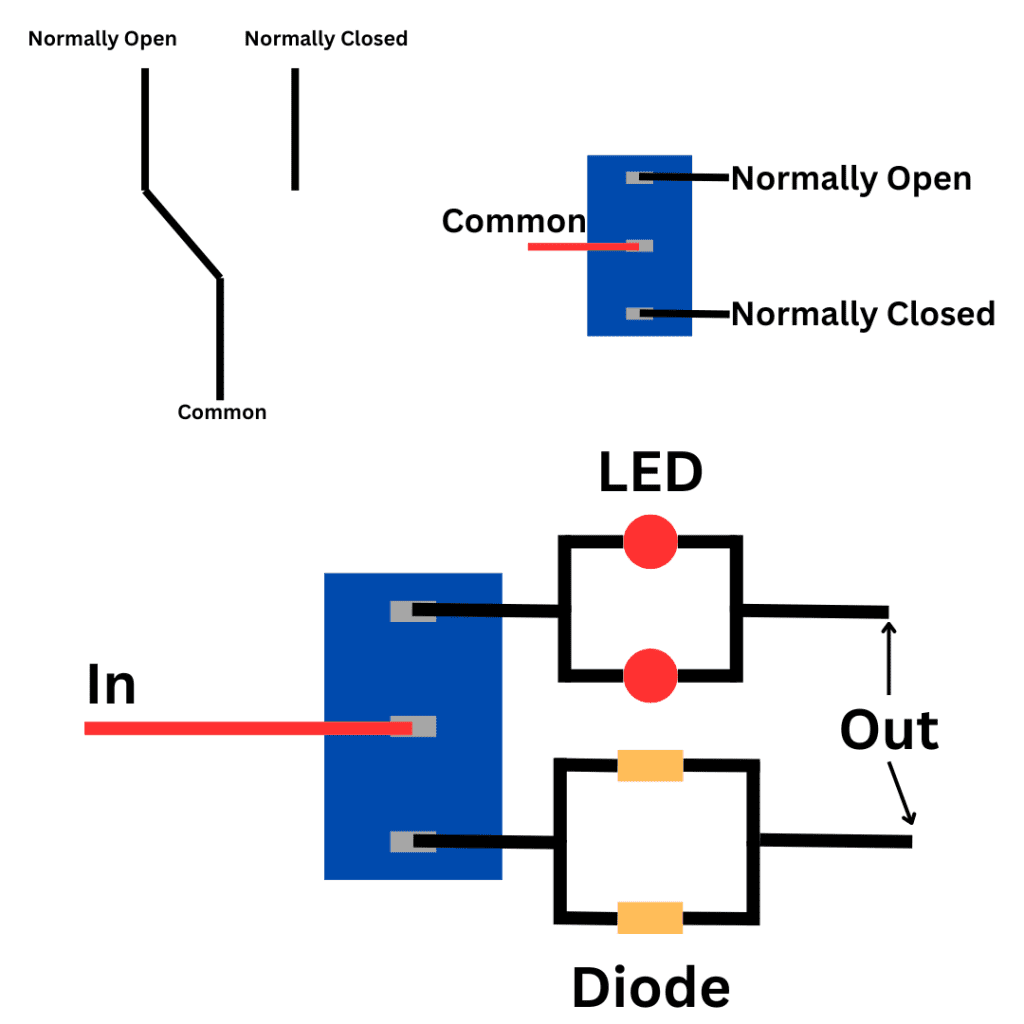
On-On DPDT Wiring
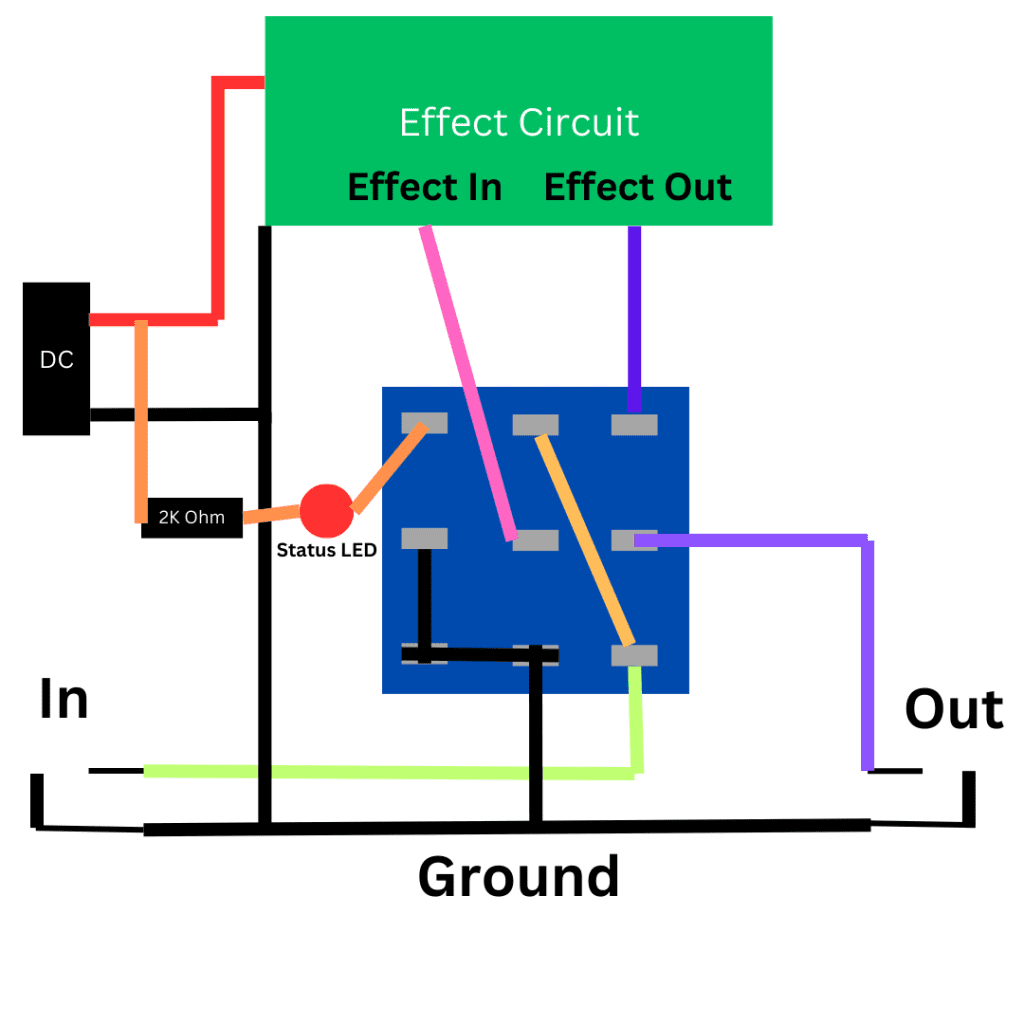
Here you have two common input wires, and each of those inputs can switch to a normally open connection or a normally closed connection. This is important: the switch can either be both normally open or both normally closed. It can’t be one one way and the other another way.
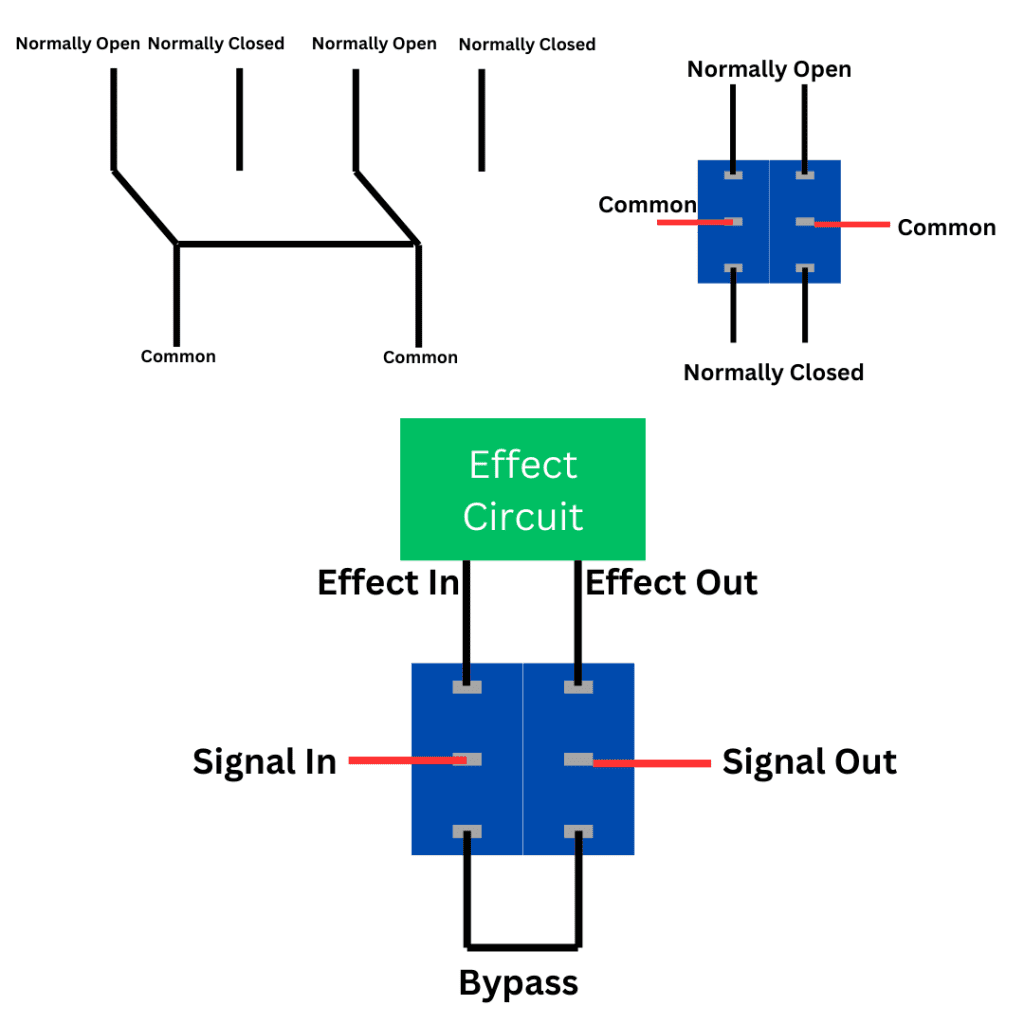
It’s also important to note that a DPDT’s second common node can be used for a signal out. As shown in the diagram above with the effect circuit, the signal comes in through the left hand common node and, depending on which way the switch is flipped, either goes through the effect circuit or through the bypass, it then goes out through the right hand common node.
In other ways, a DPDT is kind of just two SPDT next to each other, and when the switch is thrown, you’re effectively throwing two switches at the same time. Outside of guitar pedal applications, a DPDT may be used if the same signal needs to be repeated for redundancy’s sake, or if you just need to switch two things at the same time.
In guitar pedals, DPDT’s aren’t used that often, but they can be used for a pedal on-off switch, however, this either won’t have true bypass or you won’t be able to have a status LED. However, you still do a simple true bypass with a DPDT, it’s just that 3PDT is standard.
On-On-On DPDT Wiring
On-on-on are really interesting, as they allow for three states to be switched. Instead of either have both top nodes or both bottom nodes active, the middle position allows for one of the top and one of the bottom nodes to be selected.
This is how it looks:
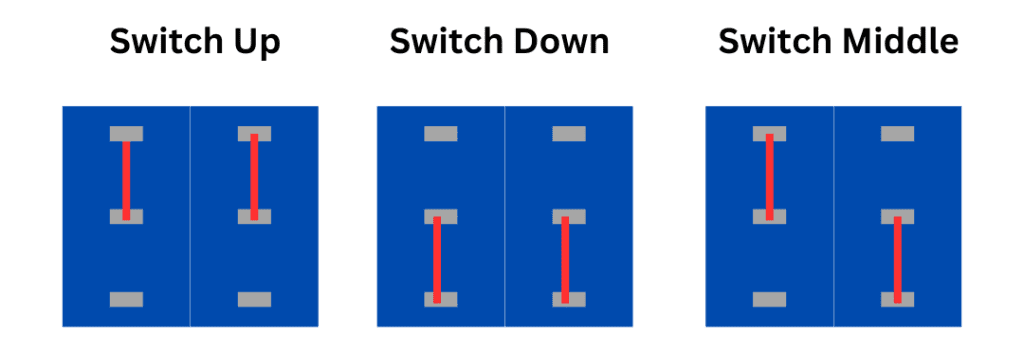
Here the red lines don’t show actual wiring, but the internal wiring of the switch when it’s in a given position.
Be careful: depending on the switch, the middle position may have the first column in the down position and the second column in the up position. Check the data sheet.
To get your head around the diagram, think about how a signal would move through the switch in a few different positions with a single jumper in place.
Click on the image to enlarge it.
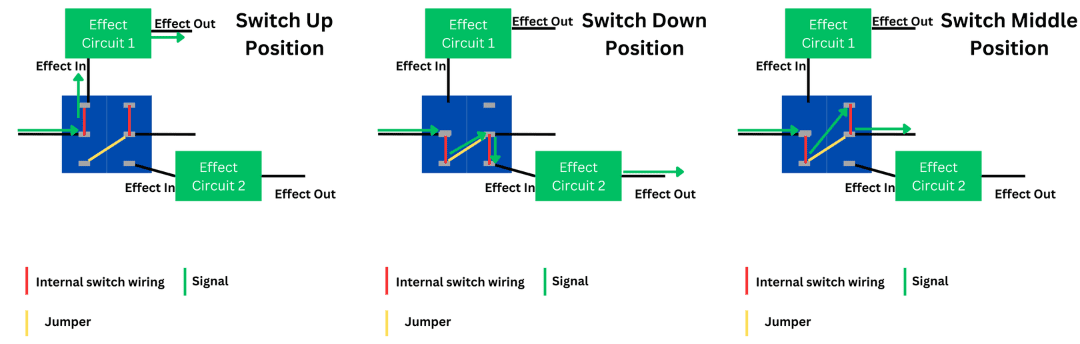
This may look complicated, but pretend that circuit 1 is a treble boost and circuit 2 is a bass boost. You have three choices:
- Switch up: the signal goes into the switch, through the internal wiring (red), through the treble boost circuit, and out.
- Switch down: the signal goes into the switch, through the internal wiring, then through the jumper wire, through the internal wiring, and then through the bass boost, then out.
- Switch is in the middle: the signal goes into the switch, through the internal wiring, through the jumper wire, through the internal wiring, and out. Both boosts are bypassed.
That’s just one simple idea for the use of an on-on-on DPDT. There are many more.
3PDT Wiring
Going all the way up to the 3PDT, this is just a switch that switches three things at once. There are three common inputs, three normally closed, and three normally open connections. Again, they either all have to be open or all have to be closed. Once again, you basically have three SPDT switches lined up together.
In guitar pedal building, 3PDTs are usually used for footswitch wiring. Although wiring a guitar pedal footswitch isn’t complicated, it does require a bit of an explanation to get it right. So read the article I’ve linked if you’d like to know more. It walks through the wiring for a true bypass and explains what’s going on, because when you first look at it, it doesn’t make a lot of sense.
As mentioned, I’ve never encountered an on-on-on 3PDT. Most of my experience with 3PDTs is for pedal footswitches, which are on-on. They may exist, I just can’t find examples of them, nor can I find how they’re wired. It’s probably with one up and two down for the middle position.
And That’s Switches
Of course there are a lot of other types of switches out there. I even mentioned the single pole, single throw. 4PDTs are pretty common for some applications, and I’m sure they go higher than that.
However, these are the switches you’ll likely encounter making guitar pedals or when doing hobby electronics. Once you get your head around these more popular switches, you can then start to play with other switches and get more creative.
As always, have fun, and get building.
Related posts:
 How To Wire A Guitar Pedal Foot Switch (3PDT)
 How To Wire 6.35mm (1/4″) Socket
 How To Wire A Guitar Pedal DC Power Jack
 What Is Stripboard And How Do You Read Layouts?
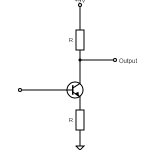 What Is Transistor hFE?
 A Versus B Potentiometers (And When To Use Them)
 How Do Guitar Pedal (And Guitar) Volume Knobs Work?
 The Difference Between Silicon And Germanium Transistors
 What Are Coupling Capacitors?
 How Does A Drive, Gain, Or Distortion Knob Work?