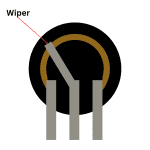
 Before launching into this quick article on how to wire a 6.35 mm socket, I’m going to tare the band-aid off and talk vernacular. The thing pictured here goes by many names:
- 1/4 inch jack or socket if you live in the U.S.A.
- 6.35 mm jack or socket if you live anywhere else.
- Guitar jack or socket
That’s six names right there, depending on whether you call it a jack or a socket. For the sake of clarity, I’m going to try and fail to be consistent with naming conventions for this “how to wire” article. I’ll mostly be using the metric measurement (6.35 mm) because I’m based in Australia and I use the metric system. However, I’ll likely be using jack and socket interchangeably.
Anyway, these things come in both mono and stereo jacks and you’ll typically need two of them for any guitar pedal build (although some pedals may use three or more). After wiring up your new pedal circuit board, perhaps a nice beginner friendly guitar pedal build, it’s time to wire up your enclosure.
Wiring up your enclosure involves wiring a footswitch, power supply, and input jacks like this. If you’re like me, you’ll continually forget this simple wiring and continually come back here to confirm it. Don’t worry, you’ll remember eventually!
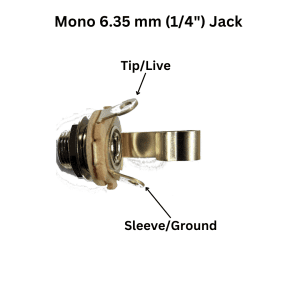
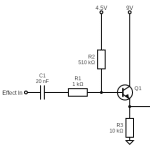
How To Wire A Mono 6.35 mm (1/4″) Jack
Most of the time, a guitar’s signal and its 6.35 mm cable will be in mono. That’s most of the time. There are stereo guitars out there, but that’s another conversation (and one I know very little about). So for the sake of this article, we’re going to assume you’re always going to be working with a mono signal.
Because of this, you’re welcome to use a mono jack for both the input and output of your guitar pedals. I’ll go into when you’d use a stereo jack in the next section.
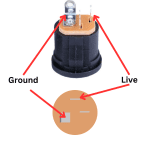
Wiring a mono guitar jack for a guitar pedal is quite simple. Here’s a picture of where each wire goes:
If that doesn’t clearly answer the question for you, here’s a few points that may answer some questions:
- Ground is shared across the entire circuit (so the ground from your effect circuit board, footswitch, and other jack can all be shared). Feel free to wire one 6.35mm socket ground to another then to the ground of your power supply (and don’t forget to get your footswitch and circuit board to ground as well).
- The live part of the component (which corresponds to the tip of the guitar cable) is your actual guitar signal.
- Assuming you’re using a 3PDT footswitch to turn your guitar pedal off and on, the 6.35 mm jack is only wired to the footswitch. The input and output wires of your pedal’s circuit are also then wired to your footswitch. More on wiring a guitar pedal footswitch here.
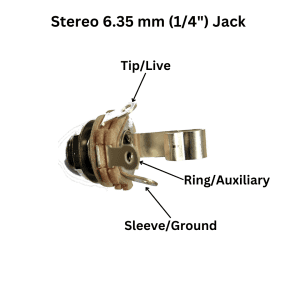
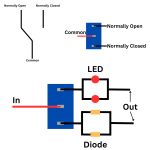
How To Wire A Stereo 6.35 mm (1/4″) Jack
Stereo jacks are also common to come across, either as part of a guitar pedal kit or if you happen to buy the wrong thing.
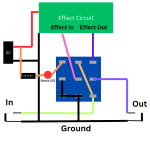
The only reason to use a stereo jack in a guitar pedal (unless you’re specifically making a stereo signal) is to disconnect battery power. Here’s the wiring which may explain this a little bit better:
Here, only the pedal’s input uses a stereo jack and the battery is wired through the auxiliary tab. This means that when the input lead is removed from the pedal, the battery’s circuit is broken, preventing it from draining.
But personally, I’m again using batteries in guitar pedals. Batteries are wasteful and there’s no reason to use them, so I discourage the use of batteries in guitar pedals. Just get a cheap 9V DC power supply and you get infinite power.
So, if you find yourself with a stereo jack and you’re unsure how to wire it:
- Just ignore the middle tab for the ring.
- Wire the ground and the live tabs as per the mono instructions above.
Related posts:
 How To Wire A Guitar Pedal Foot Switch (3PDT)
 How To Wire A Guitar Pedal DC Power Jack
 Potentiometer Wiring: How To Wire A Potentiometer
 How To Read A Circuit Diagram
 The Difference Between SPDT, DPDT, And 3PDT Switches And How To Use Them
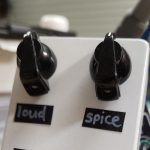
 How Do Guitar Pedal (And Guitar) Volume Knobs Work?
 How Does A Drive, Gain, Or Distortion Knob Work?
 What Is Stripboard And How Do You Read Layouts?
 The Difference Between Silicon And Germanium Transistors
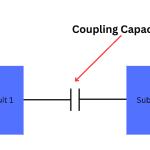 What Are Coupling Capacitors?