So you want to start making DIY guitar pedals? It may seem daunting, especially if you’re unsure of what you’ll need to get started. Well, have no fear, this article seeks to help you find out.
Fortunately, you can actually get started for relatively cheaply. This is a new hobby after all. While I think you’ll enjoy it, you probably don’t want to spend a lot of money on something you’re not sure you’ll continue to pursue.
So here’s what you need to start making guitar pedals at home.
A Good Soldering Iron
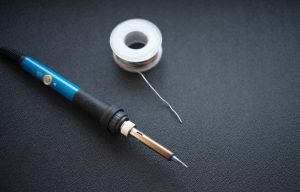 There are a lot of different soldering irons out there, and many to choose from.
I would suggest, at a minimum, to get the best soldering station that you can afford. Although this will likely be your most expensive outlay when you first get started, going too cheap on this means you may outgrow a cheap soldering iron really quickly and have to invest in a new one too quickly.
I also suggest getting a soldering station instead of a basic stand along soldering iron because a station allows you to adjust the temperature and also has somewhere to rest your iron. It has everything you need!
A Note On Soldering Iron/Station Power
If in doubt, getting a soldering iron or soldering station with higher wattage if you can afford it. 40-60 watts will likely do you well. You may see cheaper irons available that are only around 20 watts, and I wouldn’t recommend these. They take a long time to heat up and can generally just be a pain.
Solder (0.6-0.8mm lead free)
Obviously you’ll need solder to go with your soldering iron! A soldering iron melts solder and connects guitar pedal components to a PCB or strip board. It’s kind of important!
Personally, I prefer 0.8mm solder, and I would always suggest you buy lead free solder because lead is dangerous. You may prefer solder that’s a little bit thinner or a little bit thicker, but I find 0.6-0.8mm works well for me.
Solder can be a little bit on the expensive side, considering it’s a consumable. And of course the bigger role you buy, the cheaper it is. If you’re unsure what kind of solder you’ll like, buy a smaller amount and experiment.
Blu Tack
This may sound like a weird one, but it’s an extremely useful and cheap way to keep a PCB or bit of stripboard in place when you’re trying to solder components in place.
As you get more into the hobby of DIY guitar pedals, you may want to invest in a helping hand or something purpose built to hold this sort of stuff, but, if you’re just starting out, a nice big blog of Blue Tack will do the job.
Wire Cutters
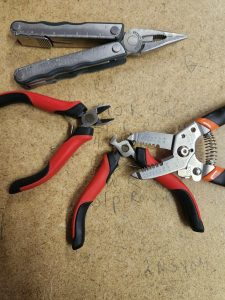 Wire cutters are needed to cut wires (obviously) as well as trim the legs of components. Getting something small and fine that will slip well into small and tight places.
I have both a pair of side cutters and end cutters; having both is useful depending on the situation you’re in and what you’re trying to cut.
Wire Strippers
Although a lot of the work you’ll be doing is on components with bare legs, you’ll be using plenty of wires to do things like connecting a PCB to a footswitch. For this, you’ll need to strip back wire.
In a pinch, if you have a steady hand you can use scissors or wire cutters to strip wire, but it takes more time and, of course, you risk cutting your wire.
So get yourself some wire strippers.
Long Nose Pliers
A pair of long nose pliers become invaluable when making DIY guitar pedals. Long nose pliers fit into small spaces if you’re wiring up the inside of a guitar pedal enclosure. A pair of pliers, in general, is also useful if you’re having trouble getting a wire through a small hole. Also, components can sometimes get hot when you’re soldering them, and a pair of pliers can be used here instead of your fingers.

Wire
While a lot of beginner kits will come with wire, it’s always a good idea to have some wire on hand.
I usually use 22 gauge solid core wire, and always have plenty on hand. I prefer solid core because it’s a bit more versatile than regular wire. It’s flexible but also strong enough to keep things in place if need be.,
Normal wire can be useful if you have a larger hole to thread it to and also need to physically wrap the end of the wire around something to keep it in place, so it’s handing to have a bit around.
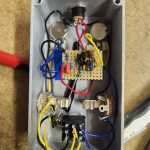
Drill And Drill Bits
After soldering you new guitar pedal together, you’ll want to put it into an enclosure. A drill and bits will be used to put holes in your enclosure for things like a foot switch, potentiometers, and input jacks.
Multimeter
 I would classify a multimeter as “nice to have,” but also fairly essential.
No matter how thorough you are with your build, you’re going to make mistakes here and there, and a multimeter is a great way to find out where mistakes are and fix them.
Other Nice To Haves
The following stuff is nice to have, and it’s mostly stuff you’ll likely have floating around the house anyway, so you probably won’t have to go out and but it. Just make sure it’s close by/you know where it is when you’re building:
- Phillips head screwdriver – you’ll need this to take the bottom of enclosures off. And you probably have a screwdriver, right?
- Electrical tape (any tape really) – I prefer electrical tape, but masking tape works well to. This can be good for covering bare wires, holding things together, etc.
- Knife – I prefer a Stanley knife because they’re sharp but also disposable. I use the knife to bread apart small shorts a lot, so although this dulls the Stanley knife, I can easily replace the blade.
- Alligator clips – you may not have these on hand, but they are useful for temporarily clipping wires together.
None of this stuff is mandatory, but it’s good to have!
That’s It!
While this list may seem a bit long, the good news is that you likely have a lot of these things already. Sure, you may not have a soldering iron laying about, but you probably have things like long nose pliers and a drill hanging about!
And now that you have all the equipment you need, pick a good beginner pedal project to start with and get building! Or hop in and checkout all of my stripboard layouts for guitar pedals.
Related posts:
 How To Wire A Guitar Pedal Foot Switch (3PDT)
 Big Guide To Debugging DIY Guitar Pedals
 Why You Should Build Your Own Guitar Pedals
 How To Wire A Guitar Pedal DC Power Jack
 How To Wire Guitar Pedal Enclosures
 Is It Expensive To Make Your Own Guitar Pedals?
How Do Guitar Pedal (And Guitar) Volume Knobs Work?
Is It Expensive To Make Your Own Guitar Pedals?
How Do Guitar Pedal (And Guitar) Volume Knobs Work?
 What Do Guitar Pedals Do?
 How Does A Drive, Gain, Or Distortion Knob Work?
 What Is True Bypass In Guitar Pedals?