So, you’ve finished building a new guitar pedal, you want to try it out so you plug it in and… it doesn’t work. If you’re built even only a single guitar pedal, you know that it’s pretty much the rule that something will be wrong the first time you plug it in. You won’t get a signal, there will be a weird hum, there will be distortion when there shouldn’t be distortion (or the wrong kind of distortion), the volume doesn’t work, the gain doesn’t work, the tone doesn’t work… just something doesn’t work.
There are three guarantees in life: death, taxes, and a new DIY pedal build not working the same time.
Hell, as I’m writing this, I’m currently working on building my suggested beginner DIY guitar pedal builds and I’m making mistakes and having to debug them. For my guitar pedal build, I’m building these so I can have them (they’re awesome pedals) and also review them and provide information for people trying to learn how to make their own guitar pedals, but I’m still making mistakes and having to fix them, even with experience.
So here’s my Big Guide To Debugging DIY Guitar Pedals. These are some tips, tricks, and how to’s of debugging guitar pedals. If I pick up more, I’ll add them here. I’ll be presenting these guitar pedal debugging tips as a series of steps from before finishing up to boxing. Somewhere in there I’ll also discuss some common instances beyond “it’s just not working.”
First Don’t Worry – This Happens To Everyone
You don’t suck at making guitar pedals. Everybody goes through this. Yes, it’s frustrating when you can’t figure out why something doesn’t work, but it’s all the more satisfying when you figure it out and it does work.
Part of the process of making your own guitar pedals is the debugging and fixing of mistakes.
So don’t worry. You’re not the only one putting up with this. It’s part of the hobby. It may not be a fun part of the hobby, but it’s part of the hobby.
Before You Finish – Stay Vigilant
You can’t really know if a guitar pedal that you’ve built works until you’ve finished it, but you can set yourself for success.
My personal rule is that if a solder joint looks dodgy, it’s probably dodgy. Does it:
- Look dry or like the solder didn’t flow well?
- Not made a good connection with the board or the component wire?
- Look like it might be touching another component that it shouldn’t?
Fix it then and there. This may be overly cautious, but it’s a lot easier to see and fix the mistake in the moment rather than when you’re staring at a populated board full of solder joints.
Newly Finished Board – Test It Before You Box It
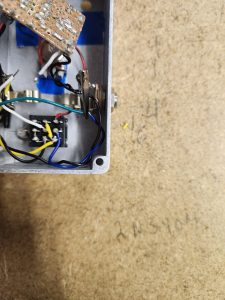
Since it’s pretty much a guarantee that your new pedal won’t work the first time, it’s best to test your newly finished board before putting it in an enclosure. It’s much easier to fix problems when it’s out of the box.
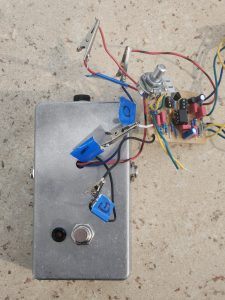 Personally, I like to use the pedal testing box that I’ve built because it’s easier to test between a bypassed signal and the signal going through the effect. With that, it also just makes it so there’s fewer wires floating around, making it easier to probe it with a multimeter or an audio probe.
Here are some common problems you may have before boxing and how you might be able to fix them.
No Sound Coming Through
This is extremely annoying. You want to hear something. Unfortunately, as common as this is, there’s not really a single thing to fix this as it could be a few issues. Try:
- Are you sure it’s plugged in? This may sound stupid, but it’s embarrassing the amount of times I’ve forgotten to plug in a power supply, the guitar leads, or even turn on the amp.
- Are you input and output leads in the right jacks? See above.
- Have you clipped op-amps and transistors into their sockets? If you use IC sockets, you may have forgotten to put them in.
- Are transistors and ICs in the right orientation?
- Are your potentiometers turned the right way? Maybe you turned your pots all the way down by mistake or you haven’t wired your pots correctly. Check them.
- Eliminating potential shorts: it’s common, especially when using strip board, for a solder joint on one row to bleed over to another row, causing a short. Look closely. If you still can’t see a short, try running a sharp knife between each row just to make sure. It’s amazing how often this works.
 Power not coming through: usually due to a poor solder joint, power may not be coming through. Test the voltage on transistors and op-amps. If they have power, you’re probably good. If they don’t work your way back to the power source.
- Audio signal stopping somewhere: there may be a bad solder joint somewhere in your audio path. Use an audio probe from the input until you find where the problem is. Take a look at my pedal tester article for how to make a simple audio probe. From there, follow the audio path signal with your probe.
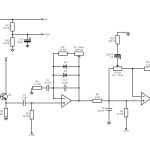
- An incorrectly wired component, a component in the wrong place, or a wrong component: finding an incorrect component or a component in the wrong place can be difficult, but it happens. Beyond that, check the wiring of components that need to be in specific orientations:
- Polarised capacitors
- Diodes
- Transistors
- Operational amplifiers
- Potentiometers
- A faulty component: this is less likely assuming you’re building a new pedal with new components. If you’re refurbishing an old pedal or using old components, you may need to test them.
- Edit from the future: when I originally wrote this article I said faulty components are unlikely and now I’ve had two builds in a row with faulty transistors. A faulty resistor is probably unlikely (it’s more likely to give the wrong resistance), but transistors and ICs can be faulty. If the audio signal stops abruptly at a transistor or IC and you’re not getting the expected power readings from the legs, investigate the power, then try a different component.
- Diodes in the wrong spot/incorrectly wired: I’ve noticed that incorrectly wired diodes can sometimes effect that audio signal before if it hits the diodes. If you’re close to diodes and your audio signal stops abruptly, that may be your problem.
 Power not coming through: usually due to a poor solder joint, power may not be coming through. Test the voltage on transistors and op-amps. If they have power, you’re probably good. If they don’t work your way back to the power source.
That’s probably not extensive (even though it looks long), but that’s generally what I go over if I’m not getting any sound. I’ve written the list roughly in order of “ease of fixing,” so start at the top and work your way down.

Hissing, Humming, Or Distortion When There Shouldn’t Be
Firstly, keep in mind that unless your input/output wires are soldered to jacks and your power/ground wires are soldered in place, some amount of electrical interference is going to occur. When testing, I usually use alligator clips to connect everything up and, since it’s not always a perfect connection, there may be some light hums or crackles. But this should be minor. If you’re getting some substantial noise in your signal, it may be down to:
- Short between power and signal path: a lot of the time, a problem with a newly built guitar pedal comes up because something is touching something it’s not supposed to. As mentioned in the last section, if you’re using strip board, run a knife between the rows.
- Poor solder joints: there may be a poor solder joint somewhere causing a not so great connection. A signal is getting through, just not very well. Remelt any joints that look dodgy.
- Leakage of DC power into the guitar signal: this is usually caused by poorly soldered filter capacitors; if you want to know more about filter capacitors, take a look at my guide to capacitors in guitar pedals.
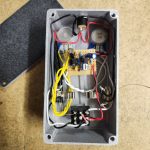
Problems After Putting The Board In The Encloser
This can be extremely frustrating. You tested your newly build board, it worked, and then as soon as you put it in the box it’s not working anymore. What happened? Let’s take a look.
Check Your Enclosure Wiring:
- Is everything plugged in correctly? Is power plugged in? Are leads plugged in? Are pots turned the right way?
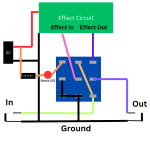
- Is the footswitch wired correctly? You may be getting poor sound or no sound if your footswitch is wired incorrectly. There’s no single way to wire a guitar pedal footswitch, but here’s how I like to do it. Also make sure there are no shorts between connections on the footswitch.
- Check the power connection: break out your multimeter again and make sure power is getting to your board.
- Check that everything is grounded properly: remember that ground is shared for everything, and there are a lot of things to ground in an enclosure: both jacks, the footswitch, and the board. Make sure they’re all grounded and the ground goes back to your power supply.
- Poor solder joints: something isn’t soldered correct on the switch, the jacks, or the footswitch. Multimeter and audioprobe time!
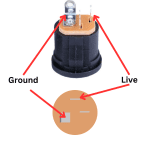
- Hint – you can attach your audio probe wire to the live tab of your output jack.
- Your enclosure is touching your board or a join on one of your potentiometers, adding resistance to your circuit.
- Something was damaged when it went it: it happens from time to time.
 Poor solder joints: something isn’t soldered correct on the switch, the jacks, or the footswitch. Multimeter and audioprobe time!
I (obviously) haven’t put these into the same sections I did for before the board goes into the enclosure, but I’ve tried to give a clear list to follow. This is because in enclosure faults often fall into a few categories that can have similar causes, so I figured it would be clearer to do it the other way around. These categories are:
- No signal at all whether the effect is on or off: this is likely a problem with the connection from one of the audio jacks or with a connection on the footswitch.
- Signal when the effect is off but not on: this is likely a power problem or an audio signal problem with the board’s connection to the footswitch.
- Poor sound, hum, hiss, etc.: this could be damage to a component/joint, a poor connection, or a power problem.
I Hope You Solve It
Nothing is more frustrating than when you finish building a new guitar pedal and it doesn’t work.
I know this list seems long, but work through it one point at a time. Eliminate what the problem can’t be to determine what the problem must be. Once you do that, you can source exactly where the problem is and fix it.
If you’ve made a few effects, you know how it is; let me know if I’ve missed any debugging tips. If you’re new to making effects, don’t let this long list put you off. All these problems don’t happen at once and, with experience, you learn how to recognise the vast majority of them very quickly.
Related posts:
 How To Wire A Guitar Pedal Foot Switch (3PDT)
 Why You Should Build Your Own Guitar Pedals
 How To Find The Audio Signal Path For A Guitar Pedal
 How To Wire A Guitar Pedal DC Power Jack
 How To Wire Guitar Pedal Enclosures
 Is It Expensive To Make Your Own Guitar Pedals?
How Do Guitar Pedal (And Guitar) Volume Knobs Work?
Is It Expensive To Make Your Own Guitar Pedals?
How Do Guitar Pedal (And Guitar) Volume Knobs Work?
 What Do Guitar Pedals Do?
 How Does A Drive, Gain, Or Distortion Knob Work?
 How To Get Started Building Guitar Effects Pedals